|
The Tanzania
'KUKU'
box Incubator
How about a sensible gift for your children your family? - Survival Education
page 2 This document 'paper' is to assist you to become a little self-sufficient, and it also links the viewer to other sites that help with food storage, food & medical items needed, wind & solar & water power and batteries etc., please look deep as soon the whole world is to weep. I give much information here to aid you in learning about the incubation of eggs. You may wish to consider simply purchasing a ready made incubator from someone, or undertake to make one yourself. The purpose of these pages is to get you started in considering to help yourself become a little self sufficient, and i simply give you a start with a simple 'box' design that is also a 'build it yourself' project for the family. The KUKU chicken egg 'build yourself' Kit incubator project is a very simple one that can be used as a home or school project. For it is not only teaching the basics of raising chickens, but it incorporates the actual building of an incubator. The KUKU chicken egg Incubator is for those of you that wish to be self sufficient in having fresh meat stocks and eggs that you can generate on a monthly basis. For not only will it feed your family, but you can help your friends and also have spare food to exchange for other items if necessary. The KUKU incubator is thermostatically temperature regulated. It is a very strong and well tried incubator that works well, and mine has been used by myself for some years and may be the beginning of a new family adventure into self-sufficiency. Mine uses two 75 watt light bulbs for heating and has a thermostat control.
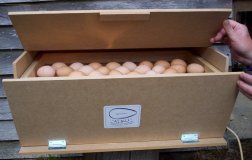
My 'Kuku' box incubator. In coming times it will be very useful to be able to "breed" your own stock of chickens for meat on a regular basis, as well as having eggs available daily. For next to the Cabbage and Potato, it is rewarding to have a few chickens in the back yard. Not only does it teach children a little responsibility in the need to "feed & water" livestock, but the "egg collection" in itself is a daily beneficial reward for their efforts. Chickens do "naturally" sit on their own eggs, but quite often "yours" may not become "broody." If you wish to have the facility to eat chickens regularly then you need to be able to incubate regularly, thus giving you a meat supply "on demand." Survival times are at hand, and the humble chicken needs be in every back yard. You can never have too many eggs, they are easy enough to give freely to your neighbours, or exchanged for something they can offer you. This web site gives you all the pertinent information as to how to use an incubator and raise chickens. The KUKU Incubator The "Kuku" egg incubator can be constructed from 9 mm compressed board. It is 600 x 350 x 270 mm, 24" x 14" x 10" high approx. A thermostat has an adjustable temperature control as well as a probe. A probe simply records temperature as does a thermometer, but it sends a signal to the thermostat 'on/off' switch. These are the items needed to build the incubator are:
The KUKU kit is easy to construct and can be accomplished within a few hours and then left overnight for the glued joints to dry. It is then simply a matter of attaching or installing the thermostat control and inserting the egg tray. For best efficiency and better heat regulation you may glue an inner surround on the sides and lid of 15 mm foam insulation. This will give a better heat distribution and lower the electricity cost of operation as heat loss will be minimised. Once this is done, the unit needs to be operated without eggs for a few hours. During which time you adjust the regulator control so as to maintain the correct temperature setting that is detailed in this paper as well as on the instruction manual of the assembly kit. Note, Some incubators use a fan to circulate the air, and they need this if they have more than one layer of eggs. For without a fan to circulate the air the upper layers of eggs would become hotter than the ones on lower levels due to heat 'rising, and the lower eggs in the 'box' would be at a much lower temperature than those higher up. This incubator has only one level of eggs, thus they all maintain an even temperature with no fan. To operate any incubator: Place the unit in a dry place out of the wind and rain, preferably in the house if you live in a cold climate, sit it on a table. Do not place it near a window exposed to direct sunlight or it may overheat the eggs and damage the embryos. Normal air exchange is needed during
the embryo development, and thus the incubator has air vents that
must not be closed off.
If you have fertilised eggs of your own that you need to store until you have a 'batch' prior to incubating them, do not keep them longer than 10 days or they may not hatch. Place water in the humidity container, this keeps a little moisture in the air to help the egg contents from dehydrating. Too little moisture results in evaporation from the eggs, causing chicks to stick to the shell and remain in the shell after 'pecking' it to break out, and they may also hatch crippled if the temperature is too high. Add water every few days as required. Take fresh eggs (less than ten days old, and not refrigerated eggs, and of course not "shop eggs" that are not fertilised) and place them on the egg rails. Hatchability is lessened when incubation is later than 10 days from when the eggs were laid. When you place the eggs in the incubator the
temperature may drop a little. Do not make any control adjustments as it will
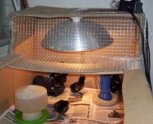
return to normal once the eggs have heated up. As you will need to turn the eggs over each morning and evening, it will be easiest to mark the eggs with a x on one side with a pencil and a 'I' on the other, so you know which ones you have turned. Turning the eggs keeps the embryo central and stops it sticking to the shell membrane, and it also keeps the egg 'core' temperature more constant. After the first 10 days, you can shine a pencil torch light under each egg in the dark and see if the embryo is formed, (dark shadow) - - - eggs that are still 'clear' inside or that show little development should be removed from the incubator. Children may wish to check an egg over the days and observe its internal development. Turn the eggs over daily only up to the 18th day, then leave them untouched until they hatch. Before you do this final turn over, remove the eggs from the tray onto a towel, and place a piece of thin cloth 580 mm x 340 mm over the egg tray and then replace the eggs. This will give the chicks an easier place to stand on and it will also collect the broken egg shells and other matter as they hatch. On the 20-21st day, you will hear "cheeps" from inside an egg, the chicks may take up to 24 hours to hatch from the time you see a slight 'crack' appearing in the shell indicating that they are alive and starting to 'break out' of their 'mould.' It may take 60 hours or so before all that are going to hatch will hatch, and any that have not begun to 'crack' their shell by them can be removed and discarded. It is best to not help the chickens to get out of their shell before they hatch as this may cause them injury. Once a chick is dry and fluffy or after 10 hours or so they must be moved out of the incubator into a breeder box. If after one day from the first chick emerging some of the eggs have not hatched it is best to remove them from the incubator so they do not hatch. They will not all hatch, 60 + % or more of original eggs placed in incubator is good, for even if you have a cockerel it may not have fertilised all the eggs being laid. Note, do not place the incubator near the fireplace, it will get too hot inside. Do not cover the small air vent holes at the side of incubator. You need to have the enclosed thermometer placed permanently on the top of the eggs so that you are able to check the correct egg temperature when you go to turn the eggs over. Note, the most important aspect of incubation is maintaining the correct temperature of the egg itself rather than the temperature ' setting' of the 'mark' on the control regulator. For the crucial 'factor' is the embryo temperature within the 'crucible.' We must differentiate between the regulator probe temperature from the actual recorded temperature of the top of the eggs, for as the probe is placed lower than the eggs, the air temperature around the probe and the fluctuating air temperature * will differ from the actual egg core temperature. The best way to know the egg temperature is to have the thermometer placed on the top of the eggs. The best embryo development occurs at 100 F. Any sustained temperature above 102 F may cause severe problems by damaging the embryo and cause deformed or dead chicks. Try and keep your 'inner of eggs' temperature range at 100 - 101 F. Once the correct temperature range is set then there is no need to make any other adjustments, and naturally the egg top thermometer will read less each time you open the door to roll the eggs over and cooler air flows in. Do not be concerned with this. Note: - The best 'simple' thermostat regulator you can use is the well proven 'Ether Wafer thermostat' - - 12 v or 240 v - that regulates the temperature within half a degree C. Note: If you live in the tropics, there may be times when the ambient air temperature will exceed the required 101 F maximum temperature. If you are living in such a place then you need to find a way of keeping the outside air at a lower than 101 F temperature. You may need to use your 'cellar' or dig a 3' x 3' x 2' deep hole in the ground in a fully shaded area, and place the incubator below ground level with a cover 6" above it and it will be alright, as below ground level temperature is usually less than 101 F. Note: The success or failure of your incubator depends upon the correct egg temperature. This 'factor' is not necessarily dependent upon the thermostat control, but it is dependant upon the correct egg temperature that itself is the result of the thermometer reading that you 'see' on the thermometer you use. This article is for those of you that are using the bulb type. Regrettably today there are many thermometers being sold in the 'market place' today that give an incorrect reading. For example when I was looking for a thermometer to place into the incubator kit I purchased two to 'trial,' and they were sitting on my kitchen table for a hour or so when I suddenly became aware that one was giving a reading of 18 C and the other a reading of 28 C - so obviously one or both were faulty. So please make sure that the thermometer you use to check your top of egg temperature is correct. Raising the chicks - the brooder box Raising a small quantity of chicks is very easy as they can all be kept in a large carton such as a 'double' joined tomato box on hatching. They need to keep warm until after about the 5th week, by which time they should be able to be self sufficient at night having grown plenty of feathers. The period from hatching until the chickens no longer require supplementary heat is called the ‘brooding period’ and usually lasts for 5 weeks. Chickens need supplementary heat when they hatch because they are unable to maintain their body temperatures. The heat can be supplied by a broody hen or, more usually by brooder box using electricity. The brooder is a container that gives the chicks protection and warmth, and they also feed and drink within its confines. If you do not have a 'brooder' then either purchase one or prepare a carton a few days before the 21st day when they are to hatch. You can take 2 cartons if you don't have a big one, cut the one side out of each, then tape them together, we are looking to get a carton about 20" x 40." (A brooder of this size will only be suitable for 8 chicks for 3 weeks or about 20 chicks for 2 weeks. After this you will need to place them into a larger space.) Place newspaper on the floor of the carton and if you can then go to the local sawmill or carpenters shop and get a sack of sawdust, for it will need less cleaning and be more comfortable for the chicks to stand on as paper is slippery. Fit a 100 watt light bulb onto a fitting that is situated about 12" above the chicks. To do this you may need to have another carton on its 'end' sitting in the brooder box so that it is like a 'shroud' that keeps warmth in.
Having a carton with the heat at one end enables the chicks to find their most comfortable space. e.g. If too hot they can go away from the light. If they all huddle together at the end under the light, then it is not warm enough, so place it lower or use a bigger wattage bulb. At night in a cold land you can cover the carton with a towel to keep it a little warmer inside. In Tasmania where it is cold in the shed I have a second lamp situated low down of 75 watts half way along the 4' carton that has it own thermostat that comes on when the temperature in the carton goes below 90F, and I cover the carton with a blanket but leave the upper 'grill' section uncovered so that it does not get too hot. As it gets colder then the chicks migrate to the lower lamp and get nearer the heat. The light 'shade' above is an aluminium bowl with a hole knocked into the bottom to fit the bulb holder into. I need the second bulb regulated as I am away for a few days at a time, but if you are home then simply select a bulb size you can leave on at night for added warmth if needed and check the floor temperature is 90 F. Starter feed or finely ground corn or wheat or other grains and clean fresh water must be provided. Ideally the water should be a plastic jar inverted into a shallow circular trough. Ordinary flat dishes can also be used such as a jam bottle lid, if the water is too deep the chickens may drown. A stone placed in the centre of the pan will usually prevent drowning by reducing the amount of water in the vessel without restricting access by the birds. Place feeders and drinkers near the heat source and, for the first 2 days, sprinkle food liberally on the newspaper to encourage the chickens to eat. Also dip each chicken’s beak in the water as it is placed in the brooder to encourage it to drink and it will know where the water is. Small flat pans or trays can also be used for feed, to reduce feed wastage, the feed tray should be gradually raised as the birds grow.. After a few weeks you can also chop up some spinach or cabbage leaves very fine and they will learn to enjoy greenery as well as their ground grains. Keep fresh food and water in front of the chickens at all times. Cleaning will have to be carried out at least once daily until the chicks have grown sufficiently and the feeders and drinkers can be raised above the litter. A screen or lid or wire mesh should be used to cover the brooder box so as to protect the chicks from invaders, be they cats or rats. Also after a week or so you can introduce finely chopped cabbage, spinach, or broccoli leaves that they learn to love. Brooder temperature The brooder must be capable of providing a temperature of
As the chickens grow, the temperature can be lowered to about 75 degrees F over 4 weeks. If the brooder box is long enough then the chicks will simply move further away from the heat bulb and no adjustments are necessary. If you live in the tropics then daytime temperature may exceed the 75 degrees so daytime heat is not required. Generally, supplementary heat can be discontinued at the end of the fourth week, but in winter, it may be necessary to provide heat on very cold nights for an extra month. If they huddle under the lamp they are too cold. As your brood grow if you are not using prepared food that contains supplementary vitamins, it will be good to supplement their diet by adding a little liquid vitamin supplement into the drinking water. Once they are laying eggs a little shell grit thrown into their yard will augment their calcium needs. Hatching times: Chickens 21 days, Ducks & Turkeys 28 days, Geese 28 - 35 days
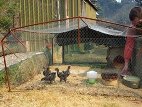
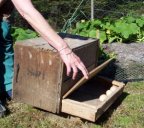
My 3 week old Australorp chicks going into their interim home for a month. As I live in a forest with Tasmanian 'Devil's' and Eastern 'Quolls,' the 'pen' is enclosed with bird mesh, even the base, and sand is placed on the floor. In the rear of the image is seen a small plywood box with 75 watt bulb to keep them warm at night for this month as their feathers grow. By the end of the fifth week they will have all their feathers, and have no need for the light heat. They join the older hens when about 2 months old. Just a little 'note' on egg collection. Some hens have the 'habit' of eating their own egg after laying, and this can be a bit of a nuisance as they can pass the habit on to others. I show you here a little egg laying box that I have. It has a little box at the rear for the eggs to roll into. I place it on a slight slope, so that once the egg is laid, it rolls away and the hens cannot reach it. Neither can the crows that are now apparently more hungry, for they can and do eat unprotected eggs and chicks, and are in the habit of hopping into any egg laying box for an easy meal. So if you are not getting eggs but do hear crows 'cawing' early morning then an egg box as shown is the answer. Naturally if you wish to have your hens sit on their eggs then they need to be able to 'nest' in a box having straw and the box below is not suitable. If you wish the hens to sit and raise their own chicks then you can find someone with a wood lathe to make an egg for you, and place a 'wooden' egg or two in their nest or a golf ball and this may halt their bad habit.
Note: One may 'wonder' why one needs to use an incubator when hens rear their chicks much better, and they also regulate the temperature correctly. It really is a matter of being able to raise chicks when you wish to, rather than waiting for a hen to get 'broody' that may take months to occur. If you need a regular supply of eggs to incubate then you must keep a cockerel to ensure they are fertilised eggs. As for using your fowls as food, remember that a freshly killed and eaten on the same day animal is always 'tough,' and this is why cattle are 'hung' in a cool room for one week before it is cut up for sale. If you kill a 'fowl' today, then once you have cleaned it and removed the feathers (or skinned it by pulling the skin and feathers off together) then let it 'hang' in a cool place away from flies for a day or more if you live in a subtropical place and the meat will be much more tender. The same applies to sheep and goats. Note: If you cannot afford a regulated incubator then as long as you have a thermometer you can incubate eggs by regulating the temperature yourself. You need to use a box or carton and make an egg tray at the top. Place a 25 watt light bulb at the lower section of the box and as the heat rises it warms the eggs. You will need to be able to regulate the temperature by having a sliding or opening section at the top so that you can open it enough to keep the temperature correct. Also if the incubator is kept in a room in the house rather than outside, the external temperature will remain more constant and it is easier to control the inner temperature. You may need to adjust the temperature morning and evening as the outside temperature changes. ~~~~~~~ This little 'info' on incubators and hens and eggs and chickens is just to get you to become more aware about the need for self-sufficiency in coming times, and it is also very necessary for the young children to begin early in learning that God gave them hands to help themselves. Too many children grow into adults biologically, but mentally they are still 'resting' in the 'nest' as 'baby chicks,' having the expectancy to be fed and housed and cared for by the 'toil' and giving of others. Not only this, but some actually demand it, and they personally make no effort to use their God-given hands to help themselves or their parents. Children will in fact get great enjoyment from seeing 'life' emerge from eggs, and also they will be very happy when they realise what self sufficiency means to themselves and you, and once they actually begin to 'produce' their own 'crops or chicks' they will feel proud and happy. Please teach them from a young age to plant and tend a few vegetables and to keep hens. They will then grow up happier and content as they will realise that 'food' does not grow in supermarkets but from their own efforts. Go to: Item 1 - - Download free plan and construction details or For information on solar panels, wind turbines, water
turbines, batteries etc go to <
Solar> good luck. If you feel that these
pages have been of assistance to you then you may wish to make a
$ 1 donation ~~~~~~~~~ ~~~~~~~~~
|