|
The Tanzania 'KUKU' box Incubator These are the free on line download plans for the 'KUKU' family self sufficiency chicken Incubator box for you to 'self-manufacture.' The incubator Kit can be made from MDF or other compressed board, or use whatever materials you wish to make yours from for your home survival project. I do not supply Kits of the incubator box as it is too expensive to ship overseas. You need to read this entire instruction so as to be familiar with what you are about to do.
You will be using water based glue as well as nails for the joints, so have a small container of water and a cloth nearby to keep your fingers clean once you have wiped some glue on to the edges to be glued. You can of course use a small paint brush or a small knife to smooth it on with. The incubator is 24 “x 16”size and about 10”deep, so the table you are going to work on needs be a little larger than the package you receive. Familiarise yourself with the sketches of the incubator.
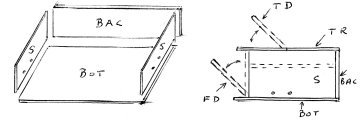
Above ( left ) shows box
without top or front fitted. STEP – 1 The first thing to do is drill 4 x 9 mm air holes about one inch above base as seen above. These holes may also be used to run wiring and control probe into the box. Then glue and nail the 2 rails ( R ) to the 2 – 350 x 220 side ends ( S ) and The air holes will be at the bottom of the incubator, and the rails will be fixed 70 mm below the top at the other end. So lay the two side ends down flat next to each other with the holes towards you and draw a line across both of them 70 mm down from the top. The top of the rail will be level with the line so that the egg tray sits on this point. Once you have drawn this line, continue it around the sides of the board.
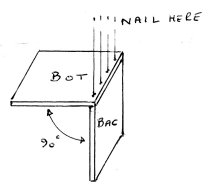
Then you place glue on the wood rail ( R ) and placed it onto the MDF board and turn it over and then nail through the MDF board ( S ) into the rail about 2” in from each end, and before you knock the nail in, you need to just look at the wood end and make sure it is level with the line you have drawn on the side of the board, for with the glue it is easy for it to slide out of place as you turn it over. The wood rail must not protrude past the MDF at either end. It is best to have someone to help you and hold things flat. Make sure that you wipe any glue from your fingers with a damp cloth or it will mark the board. STEP – 2 The next thing is to glue and nail the 600 x 220 – back of the incubator ( BAC ) to the base ( BOT ) and - - - - Get someone to hold the ( BAC ) on its edge and put some glue onto it. The 600 x 400 – base ( BOT ) is then placed onto it and nailed with 5 nails spaced across it. nail both ends first about 2” in from the end but - - - - Before you put the nails in you need to ensure that it is 90 degrees to the back, and to do this you can simply get your helper to also hold one of the 350 x 220 ends ( S ) under the base and push it up against the back so that all is square and, - - - Make sure the nail is only 4 mm in from the edge of the board and held vertically so that it goes down straight and centrally into the piece being nailed.
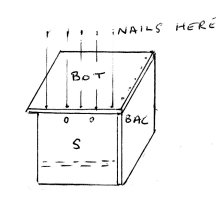
STEP – 3 The next thing is to glue and nail the two 350 x 220 ends ( S ) with the rails onto the base and the back that you have just joined. Do one first by keeping the base still upside down. Put glue on the lower end of one 350 x 220 end (by the holes) and also on the end that will ‘abut’ and join to the back ( BAC ). Please note that as it is all still upside down, that the rails ( R ) will be nearest the table top and facing inwards towards the middle of the incubator. As soon as BOT is nailed to S as in image below then tip the unit so that BAC is upwards and nail through the back ( BAC ) into this side piece ( S ).
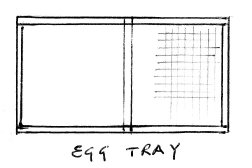
You then repeat the process with the other end ( S ) and then turn the box onto its base. STEP – 4 The next and last item to be glued and nailed is the top lid section the 600 x 230 – lid top rear ( TR ) Take the ( TR ) section 600 x 230 and without any glue place it onto the top of the incubator to the rear of it. As it does not come to the front you need to draw a pencil mark on the top of the sides S so that you do not glue past this point, because the top front TD is not glued down as it is hinged to open upwards. TR is going to be nailed onto the rear section BAC as well as to the tops of the two side pieces S, so look and see if the two vertical sides fit exactly to its width or maybe you have not nailed them squarely. If they are not quite square then you are going to have to pull them over one way of the other before nailing TR onto them. Now run some glue around from one pencil mark round the back and up to the other pencil mark. Place the lid on making sure that it is square at the rear then place the first nail is in the middle at the rear. The next two nails are also on the rear about 2” in from the ends and this ensures that the rear of the box is straight with TR. Then add in another few nails along the back. Now you can nail the lid down onto the two side bits S but make sure you pull them so that they are level with the edge of the lid. STEP – 5 The 600 x 220 – front door FD – The FD is now stood up against the front of the incubator and it will be fixed at the bottom only using the two hinges, for it becomes an opening door that opens towards you. Prop it up against the front of the incubator and then open the two hinges to 90 degrees and lean them up against the door about 4” in from each end. It is important to fix them properly, so first using a biro or pencil mark the holes in the hinges against the FD - - - then lay FD down on the table and with a 3”nail or similar just punch the centre of the ink mark so that it makes an indentation about 2-3 mm - - then place the hinge on it and screw in the screws to ( FD ) Then place the panel back up against the incubator and using the pen mark the holes of the hinges where they sit on the base ( BOT ) Remove the door and again use the nail to make a central punch mark on BOT that also helps the screws to start. Then replace ( FD ) and screw in the screws. Close ( FD ) and tie a piece of string around the incubator so it stays vertical up against the front. STEP – 6 The 600 x 160 – top door front ( TD ) becomes a hinged section opening upwards, and it is placed on top of the box up against the ( TR ) section that glued on earlier. Just align this ( TD ) so that it sits properly. – It is not glued as it will be hinged using a 1“ wide cloth strip. Using a ruler just draw a line across the top of each panel about half an inch away from the join, this will give you a total width of 1” to put on some glue. Prior to putting on the glue, lay the 1” tape across the top and cut it to the correct full length of the box or maybe 3 mm shorter. Put glue between this pencil strip across the top of the box and then lay the cloth strip on the table and also put glue on one side thinly. Then turn it over and place it onto the box so that it joins both sides and becomes a cloth hinge. Glue the 40 x 40 x 20 mm drilled thermostat 'probe' holder block onto the base about 6" away from the bulb as seen in this image and have the hole at the top so the probe is away from the base.. Your Kuku box is now nearly completed. You must not open the newly fitted ( TD ) top door until the next day so that the glue can harden on the cloth as also the whole box. There is now one last thing to do and that is to glue on the lid lock ( L ) that is glued under the front 'overhang' of the TD door. Once this is done then it stops the ( FD ) from opening. So for the time being just leave the string tied around ( FD ) Just put some glue on one side of the ( L ) piece and glue it to the underside of the ( TD ) and as you so do, you push it towards the ( FD ) so that when it is dry, it will keep ( FD ) closed properly - make sure you have no glue on the side edge of ( L ) or it will glue itself to the ( FD ) and you will not be able to open the ( TD ) lid on the next day ! If it does get stuck then use a hammer lightly to bang it upwards the next day and, - - - if you have a small clamp you can clamp ( L ) to ( TD ) so that it does not fall off before the glues has set. Leave the box now until the next day. To open it you first lift up the top lid TD and then pull the FD front door towards you. When you wish to turn over the eggs, you pull the FD open about 8" and lean it on your 'tummy' and pull out the egg tray and let it sit on the top of the FD that your body is holding in position. When you make the egg tray, make sure that the two shorter ends are fitted between the long section, for if you fit them onto the ends of the long sections it will not fit into the Box. Once you have glued and nailed the 4 corners, then place the wire mesh over it and put 6 nails along long sides and 4 on short sides. - - - hammer them in half way then bend them over the wire. Also then place a short piece onto the middle of the wire and nail it to long ends - this gives the wire some support in the middle.
Once this is all done then you can affix the thermostat and heat bulbs or other element you are using. The two 60 watt bulb holders will be screwed to the BAC about 1"above the base BOT and placed12" apart. If you wish, you may screw the light bulb 'batten holders' onto the BAC together with Step 1 prior to gluing S onto BAC. The thermostat probe can be inserted through one of the holes in S. If you have arrived at this page without first going to the main KUKU page then go there as it contains much info on incubation. All the best on your road - Terry
~~~~
|